
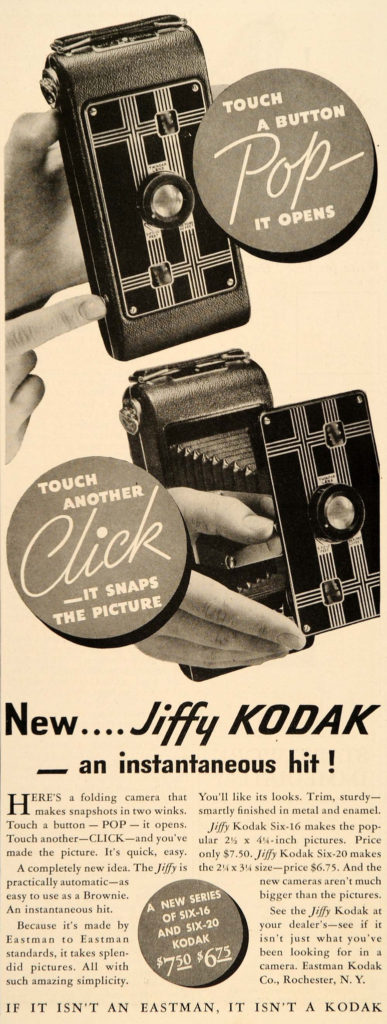
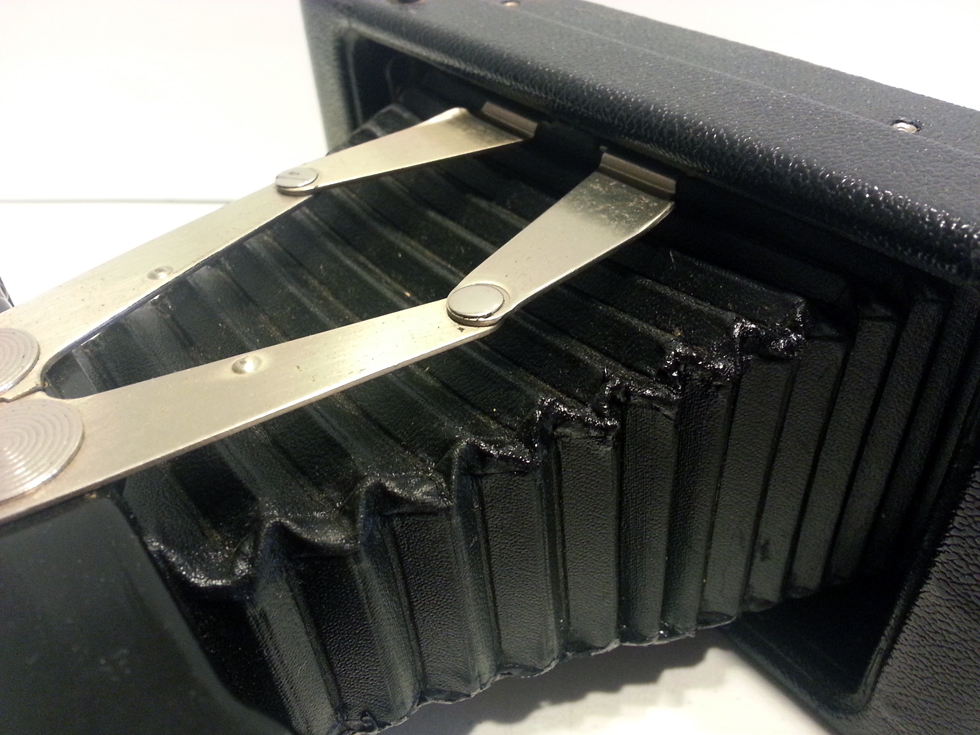
Cameras’ Art Deco phase was fleeting, lasting only between 1928-1937, but Eastman Kodak put out some beauties during that time. The Vanity Line of Vest Pocket cameras came in a variety of colors with matching bellows and a body covered in a diamond patterned faux fabric with a case to match as well. Some of the flat faces even had bright segmented colors in stain glass-like patterns. The faces were carried on into Kodak’s boxy Brownie Beau line that appeared in four colors from 1930-1933. The still serious looking Jiffy made an apperance looking almost like every other black folding camera of the its time, but from 1933-1937 it came with a beautiful Art Deco face of mirrored black and silver. While not as standoutish as its colored cousins, it can still be procured easily and for around only $30. There are plenty still out there because they were specifically designed and billed as the most user-friendly folding camera ever created. Almost every other folder on the market required a bit of effort to unfold and extend, and they were a little harder for the general public to grasp since they featured controllable settings like shutterspeed and and aperture, requiring the user to have a bit of knowledge of light. While that generally is a good thing, people wanted “point and shoot,” less control in a sense, which makes sense why box cameras like the Brownie took off later.
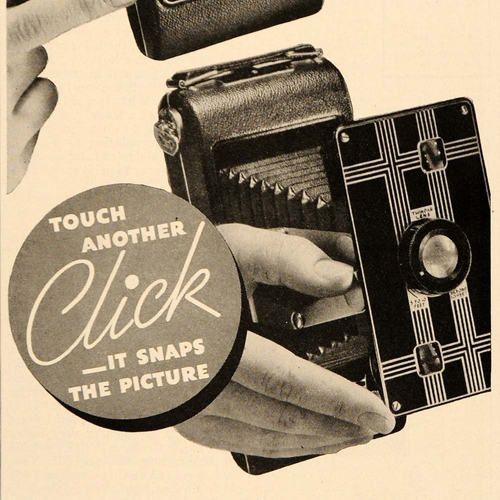
It was marketed as a quick-at-the-ready camera with only a one button press rendering the camera operational. Just a click and the bellows were extended and you’re all ready to go with the shutter lever.
It does have a 5-10 feet and a beyond-ten feet focal option by turning the lens. There is a no man’s land in between you could twist around in, but since you’re looking through a separate viewfinder (your choice of portrait or landscape) to set up your shot, you’re not going to be able to see any kind of specific focus results.
The shutter speed is fixed at around 1/50th sec or you can do a long exposure shot by leaving the shutter open. I like that the design doesn’t require you to hold anything down, just flick, and then flick (finish flicking) again to close. With the swing out stand and a steady hand (or using a black hat/item over the lens during the before and after lever touching), you could presumably take a great long exposure indoors or at night.
There is also an aperture slide but it’s almost hidden to where a user would miss it without reading of its existence in the operations manual. There is no marking, just a tiny silver lip that pulls a strip across the lens with 3 different holes for apertures around f8, f11 and f16.
Anyway, there is plenty written already about this camera online. I just wanted to express how much I ended up liking this camera for its beauty and simplicity.
So, I added a Jiffy to my working collection. I put a $30 with free shipping bid on a clean looking ebay Jiffy that included the manual and original leather case and walked away from the computer. The next day I found I had won it, and as soon as it came in the mail I let the excitement finally wash over me. It looked amazing as if it had lived inside that beautifully grandpa smelling leather case almost its entire life. I popped it open, found original Six-16 film in it, took it out and discovered that a 35mm can would in fact fit swell in its place.
All that was required to make her shoot was some electrical tape. To keep from pulling out too much of my 35 roll and exposing it necessarily with the door off, I taped a used negative strip lead to the winding Six-16 spool, then taped my new film to that. 35mm is obviously a lot narrower film than Six-16 but the pluses are, (1) they still make it, (2) it’s cheap to buy and develop, and (3) you get to expose out over the Sprocket holes!
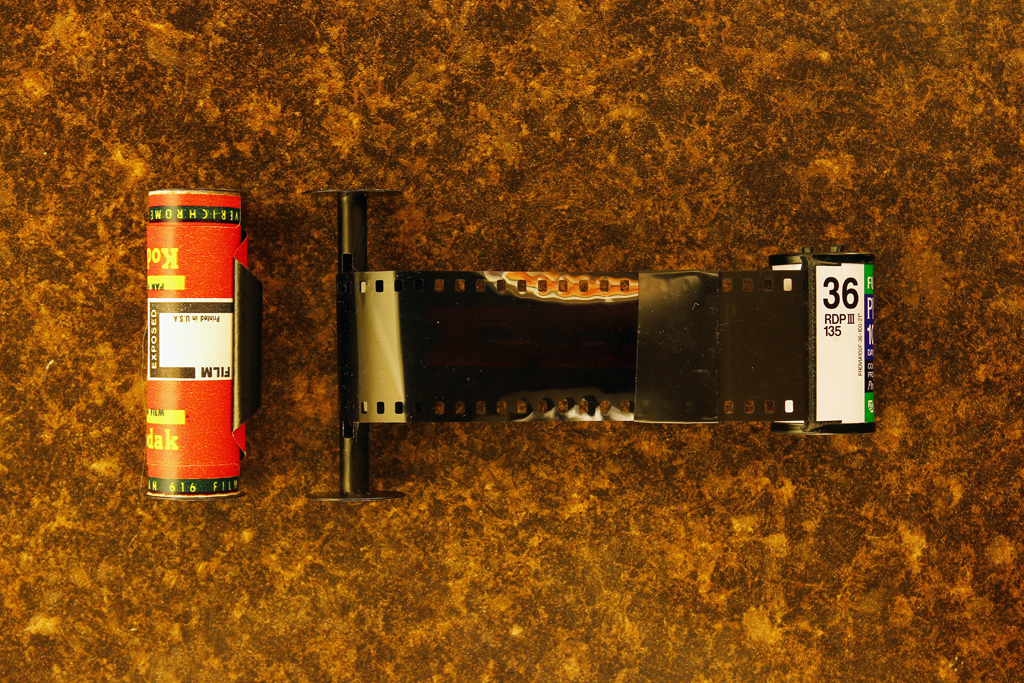
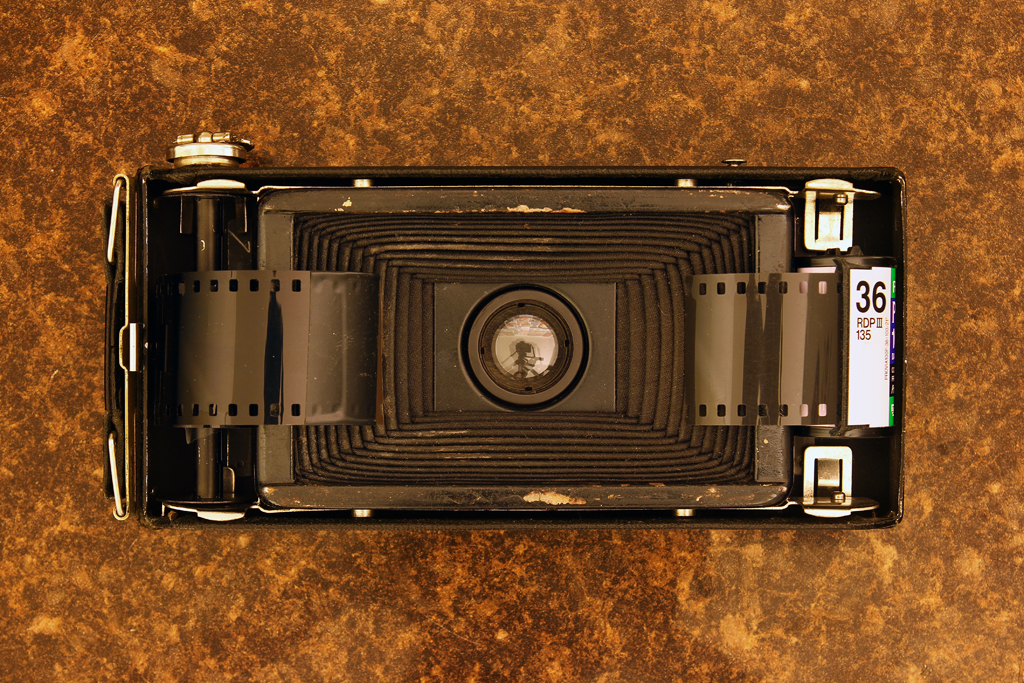
With the film taped to the wind spool and the film stretched across, the can can’t help but stay centered in the other spool area so no foam or spacers are required. As a bonus, I’d recommend while you have your film stretched across, to count how many sprocket holes on one side are in the camera’s exposure area. I count 23 on my Jiffy Six-16 and 19 on my Kodak Brownie. This is a good step to allow you to know how much to wind your crazy film for each photo’s exposure. You can keep from overlapping or wasting too much film with more tape and a piece of an old binder.
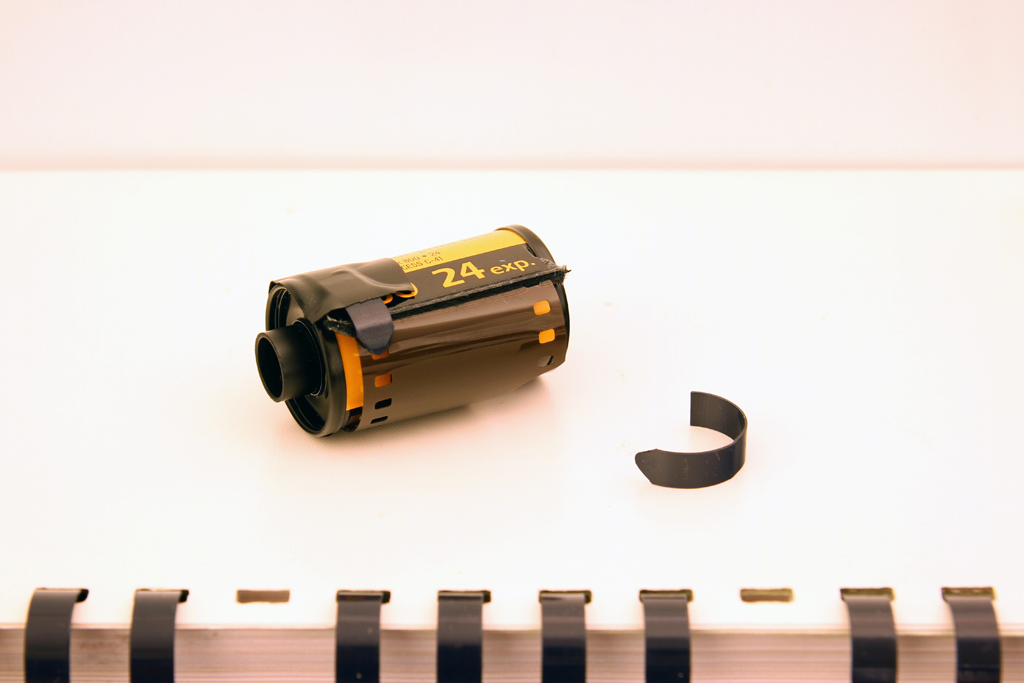
You’re looking for a plastic comb bound book and you only need one ring and your wife probably won’t even know if one or two are missing from her book. Cut one off with scissors and simply tape it pointy side towards the film so that the tip sits inside a sprocket. This will cause the unrolling of the film to click at each sprocket pass so you can count when to stop winding between shots.
Give it a test with it open if you like and make sure you can still hear the click after you close up the back.
 But wait! STOP! If you have a window on the back of your camera, tape it up right now with more electrical tape. Put a couple layers on there to be sure. The old film had backing paper that kept the film from getting exposed and the window was to allow you to see the numbers written on there to indicate what photo you were on to help with winding. 35mm doesn’t have this advantage so seal her up or light will find its way in and cause spotting or worse on your images.
Well that’s it. That’s all it takes. Essentially some electrical tape and call it done.
Remember to think about your narrow film while using the viewfinders. You can make some beautiful panoramas if you remember what you’re working with.
There are two after steps you should know about.
1. Once you’ve shot your roll, you have to unload it in the dark. Wait until night if you want or go inside your windowless bathroom or storage room, open your camera, pull out the joined spool and roll, remove the binder piece from your canister if you added it (if you forget this step you could chance tearing your film), and simply twist the protruded 35mm canister end, winding the film back into itself. It helps if you hold the opposite end each time you let off pressure with your spinning hand or else the center will free spin and you’ll have to build up resistance again. These words are unnecessary, you’ll understand it as soon as you try and the process will take you less than a minute. After you’ve spooled the film back in all the way up to your electrical taped lead splice, it’ll stop winding and you’re done. Get back into the light, remove the tape from the film end and head to the photo lab.
2. Any photo lab can process your film. Instead of just confusing them by explaining what you’ve done and what you used to do it, just tell them “Process only and don’t cut.” That’s it. Once they’re done, you’ll get your long film strip back and you will have to scan it yourself. This is what you’ll have to do anytime you expose out to your film edge with any camera and want to actually keep your precious sprocket holes with your images. And you’ll have to do it on a film scanner that has had its plastic holder modified just a hair with an x-acto knife. I’ll add a quick write up on this, but google it for now, you’ll be okay without me. *You can get by for a while by taping your negative straight to the glass (on a backlit scanner capable of scanning negatives) BUT you will get Newton Rings on your photos. Google that too while you’re at it. They’re not pretty but to some people, they’re not the end of the world (but they are).
Laniappe.
Film Choice: Make no mistake, I live in the digital camera world so my opinions are still forming based off my experiences, but I’ve had great luck running 400 speed film. It’s my go-to starter film. I can experiment with other speeds and expired stock after I’ve learned the nature of a new beast. Film is a lot more forgiving than digital in overexposures. It’s a lot harder to jack up a roll with too much light and since most older or toy cameras operate in the f11 – f16 range, I’ve found them to be pretty light hungry. I’ve ruined rolls with too little light, but not with too much. Run some store bought 400 so you can at least get a baseline and see what the camera can do and if it’s even working at all.
Camera Quirks: This is not a close up camera. The closest the camera states is 5ft and that seems generous to its actual focal range. Far away so far has been great. Closer shots have failed. It does appear that there abnormalities on the ends of the photos along with some swirlies. As it stands, that’s what I’ll come to expect with it. I’ve toned down some of the blemishes by addressing holes in the bellows, but with this type of photography I expect each camera to be different, have its own personality if you will, and I’ll work around that. My Kodak Brownie seems to create soft tone photos which is great for the same reasons. And lastly, at this 23 sprocket panoramic size, remember you’re going to get a lot fewer photos per roll so account for that in your shoot choosing and budget.
Updates (8/7/15)
Pinholes: I’ve found ugliness in some of the processed film in the same areas each time. I took a flashlight into the bathroom, killed the light, opened the camera and looked for light to shine through as I moved the flashlight along the bellows’ edges. Sure enough, some pinholes have developed along a couple corners. I bought some liquid electrical tape and applied it to the affected areas and then let it dry overnight. The liquid tape should allow everything to stretch back out. I do not see any more light coming through so so far so good. (I’ve addressed this issue a couple times so far and to some people, light leaks are not the end of the world (they aren’t).

I feel I understand camera collecting just for collecting (obsessions can be my thing too if I don’t guard myself), but I really found interest in finding a way to breath life into old relics again.
All photos taken with this camera are updated here: Flickr – Kodak Jiffy Six-16 album.